End-to-end infra node installation of OCS on OCP
Overview
This guide aims to provide a fairly quick procedure for the task at hand and is based mostly on Red Hat’s training lab
It tries to include all the steps starting from an actual installation of the OCP cluster on AWS and put OCS on top of that, up until a performance test which can be run at the end to verify that we have a working environment.
📌 NOTE
We explicitly install the OCS part directly on infrastructure nodes, this will leave the 3 worker nodes available for any applications that will eventually make use this storage. Monitoring applications are also moved to these infra nodes.
Openshift installation on AWS cloud
Verify your AWS environment
We need to check that our AWS account is configured correctly:
export AWS_PROFILE=[your AWS username goes here]
aws configure get region
Example output:
eu-central-1
Create your install-config.yaml
openshift-install create install-config --log-level info
Example output:
? SSH Public Key <none>
? Platform  [Use arrows to move, enter to select, type to filter, ? for more help]
> aws
  azure
  gcp
  openstack
  ovirt
  vsphere
This will create a file such as the one below that will be used during the installation:
apiVersion: v1
baseDomain: example.com
compute:
- architecture: amd64
  hyperthreading: Enabled
  name: worker
  platform: {}
  replicas: 3
controlPlane:
  architecture: amd64
  hyperthreading: Enabled
  name: master
  platform: {}
  replicas: 3
metadata:
  creationTimestamp: null
  name: CLUSTERID
networking:
  clusterNetwork:
  - cidr: 10.128.0.0/14
    hostPrefix: 23
  machineNetwork:
  - cidr: 10.0.0.0/16
  networkType: OpenShiftSDN
  serviceNetwork:
  - 172.30.0.0/16
platform:
  aws:
    region: eu-central-1
publish: External
pullSecret: '{"auths":{"cloud.openshift.com":{"auth":"...","email":"..."},"quay.io":{"auth":"...","email":"..."},"registry.connect.redhat.com":{"auth":"...","email":"..."},"registry.redhat.io":{"auth":"...","email":"..."}}}'
=== Actual installation of the cluster
Back up the install-config.yaml before you begin the installation
cp install-config.yaml install-config.default.yaml
⚠️ WARNING
openshift-install will remove this file when the installation starts
We are now ready to begin the installation:
openshift-install create cluster --log-level debug
Example output:
DEBUG OpenShift Installer 4.6.16
DEBUG Built from commit 8a1ec01353e68cb6ebb1dd890d684f885c33145a
DEBUG Fetching Metadata...
DEBUG Loading Metadata...
DEBUG   Loading Cluster ID...
...
You can check instance creation from the AWS side of things:

If all goes well you should get this:
Example output:
...
DEBUG Still waiting for the cluster to initialize: Cluster operator authentication is reporting a failure: WellKnownReadyControllerDegraded: kube-apiserver oauth endpoint https://10.0.140.185:6443/.well-known/oauth-authorization-server is not yet served and authentication operator keeps waiting (check kube-apiserver operator, and check that instances roll out successfully, which can take several minutes per instance)
DEBUG Still waiting for the cluster to initialize: Cluster operator authentication is reporting a failure: WellKnownReadyControllerDegraded: need at least 3 kube-apiservers, got 2
DEBUG Cluster is initialized
INFO Waiting up to 10m0s for the openshift-console route to be created...
DEBUG Route found in openshift-console namespace: console
DEBUG Route found in openshift-console namespace: downloads
DEBUG OpenShift console route is created
INFO Install complete!
INFO To access the cluster as the system:admin user when using 'oc', run 'export KUBECONFIG=/home/$USER/install/auth/kubeconfig'
INFO Access the OpenShift web-console here: https://console-openshift-console.apps.CLUSTERID.example.com
INFO Login to the console with user: "kubeadmin", and password: "***********"
DEBUG Time elapsed per stage:
DEBUG     Infrastructure: 7m4s
DEBUG Bootstrap Complete: 9m59s
DEBUG                API: 7s
DEBUG  Bootstrap Destroy: 59s
DEBUG  Cluster Operators: 16m48s
INFO Time elapsed: 34m58s
We can also check the installation progress as soon as the API is up:
export KUBECONFIG=/home/$USER/install/auth/kubeconfig
oc get co
Example output in case of successful installation:
NAME                                       VERSION   AVAILABLE   PROGRESSING   DEGRADED   SINCE
authentication                             4.6.16    True 	     False         False	  2m59s
cloud-credential                           4.6.16    True        False         False	  29m
cluster-autoscaler                         4.6.16    True        False         False	  22m
config-operator                            4.6.16    True        False         False	  23m
console                                    4.6.16    True        False         False	  12m
csi-snapshot-controller                    4.6.16    True        False         False	  23m
dns                                        4.6.16    True        False         False	  22m
etcd                                       4.6.16    True        False         False	  22m
image-registry                             4.6.16    True        False         False	  17m
ingress                                    4.6.16    True        False         False	  16m
insights                                   4.6.16    True        False         False	  23m
kube-apiserver                             4.6.16    True        False         False	  21m
kube-controller-manager                    4.6.16    True        False         False	  21m
kube-scheduler                             4.6.16    True        False         False	  20m
kube-storage-version-migrator              4.6.16    True        False         False	  16m
machine-api                                4.6.16    True        False         False	  17m
machine-approver                           4.6.16    True        False         False	  23m
machine-config                             4.6.16    True        False         False	  21m
marketplace                                4.6.16    True        False         False	  22m
monitoring                                 4.6.16    True        False         False	  15m
network                                    4.6.16    True        False         False	  24m
node-tuning                                4.6.16    True        False         False	  23m
openshift-apiserver                        4.6.16    True        False         False	  18m
openshift-controller-manager               4.6.16    True        False         False	  22m
openshift-samples                          4.6.16    True        False         False	  17m
operator-lifecycle-manager                 4.6.16    True        False         False	  22m
operator-lifecycle-manager-catalog         4.6.16    True        False         False	  22m
operator-lifecycle-manager-packageserver   4.6.16    True        False         False	  18m
service-ca                                 4.6.16    True        False         False	  23m
storage                                    4.6.16    True        False         False	  23m
Deploy your storage backend using the OCS operator
Scale OCP cluster and add new infra worker nodes
In this section, you will first validate the OCP environment has 2 or 3 worker
nodes before increasing the cluster size by additional 3 worker nodes for OCS
resources. The NAME of your OCP nodes will be different than shown below.
oc get nodes -l node-role.kubernetes.io/worker -l '!node-role.kubernetes.io/master'
Example output:
NAME                                            STATUS   ROLES    AGE   VERSION
ip-10-0-129-119.eu-central-1.compute.internal   Ready    worker   17m   v1.19.0+e49167a
ip-10-0-185-158.eu-central-1.compute.internal   Ready    worker   20m   v1.19.0+e49167a
ip-10-0-209-48.eu-central-1.compute.internal    Ready    worker   17m   v1.19.0+e49167a
Now you are going to add 3 more OCP infra nodes to cluster using machinesets.
oc get machinesets -n openshift-machine-api
This will show you the existing machinesets used to create the 2 or 3 worker nodes in the cluster already. There is a machineset for each of 3 AWS Availability Zones (AZ). NOTE: In the case of only 2 workers one of the machinesets will not have any machines (i.e., DESIRED=0) created.
Example output:
NAME                                    DESIRED   CURRENT   READY   AVAILABLE   AGE
CLUSTERID-ltkvj-worker-eu-central-1a   1         1         1       1           32m
CLUSTERID-ltkvj-worker-eu-central-1b   1         1         1       1           32m
CLUSTERID-ltkvj-worker-eu-central-1c   1         1         1       1           32m
Create new MachineSets that will in turn create storage-specific nodes for your OCP cluster in the AWS AZs:
We are now ready to load two important variables for our OCS deployment.
CLUSTERID=$(oc get machineset -n openshift-machine-api -o jsonpath='{.items[0].metadata.labels.machine\.openshift\.io/cluster-api-cluster}')
RHCOS=$(aws ec2 describe-images --filters "Name=name,Values=rhcos-4*" --query 'sort_by(Images, &CreationDate)[-1].ImageId' --output text)
Having taken inspiration from here we will now create 3 new MachineSets that will run storage-specific infra nodes for your OCP cluster:
curl -s https://raw.githubusercontent.com/mikelo/mikelo.github.io/master/ocs/cluster-workerocs-eu-central-1-infra.yaml | sed -e "s/CLUSTERID/${CLUSTERID}/g" | sed -e "s/RHCOS/${RHCOS}/g" | oc apply -f -
Check that you have new machines created.
oc get machines -n openshift-machine-api | egrep 'NAME|workerocs'
Example output:
NAME                                             PHASE     TYPE         REGION         ZONE            AGE
$CLUSTERID-ltkvj-workerocs-eu-central-1a-7lrkm   Running   m5.4xlarge   eu-central-1   eu-central-1a   6m26s
$CLUSTERID-ltkvj-workerocs-eu-central-1b-jzsnz   Running   m5.4xlarge   eu-central-1   eu-central-1b   6m26s
$CLUSTERID-ltkvj-workerocs-eu-central-1c-hkj8n   Running   m5.4xlarge   eu-central-1   eu-central-1c   6m26s
They will be in Provisioning at first and eventually in a Running PHASE.
NOTE: workerocs machines are using the AWS EC2 instance type m5.4xlarge which has 16 cpus and 64 GB memory.
Now you want to see if our new machines are added to the OCP cluster.
oc get machinesets -n openshift-machine-api | egrep 'NAME|workerocs'
Example output:
NAME                                       DESIRED   CURRENT   READY   AVAILABLE   AGE
$CLUSTERID-ltkvj-workerocs-eu-central-1a   1         1         1       1           7m22s
$CLUSTERID-ltkvj-workerocs-eu-central-1b   1         1         1       1           7m22s
$CLUSTERID-ltkvj-workerocs-eu-central-1c   1         1         1       1           7m22s
Check the nodes as shown below:
oc get nodes -l node-role.kubernetes.io/worker -l '!node-role.kubernetes.io/master'
Example output:
NAME                                            STATUS   ROLES          AGE     VERSION
ip-10-0-129-119.eu-central-1.compute.internal   Ready    worker         45m     v1.19.0+e49167a
ip-10-0-138-77.eu-central-1.compute.internal    Ready    infra,worker   3m17s   v1.19.0+e49167a
ip-10-0-181-225.eu-central-1.compute.internal   Ready    infra,worker   3m16s   v1.19.0+e49167a
ip-10-0-185-158.eu-central-1.compute.internal   Ready    worker         48m     v1.19.0+e49167a
ip-10-0-200-230.eu-central-1.compute.internal   Ready    infra,worker   3m19s   v1.19.0+e49167a
ip-10-0-209-48.eu-central-1.compute.internal    Ready    worker         45m     v1.19.0+e49167a
Installing the OCS operator
In this section you will be using three of the worker OCP 4 nodes to deploy OCS 4 using the OCS Operator in OperatorHub. The following will be installed:
- An OCS OperatorGroup
- An OCS Subscription
- All other OCS resources (Operators, Ceph Pods, NooBaa Pods, StorageClasses)
Start with creating the openshift-storage namespace.
oc create namespace openshift-storage
You must add the monitoring label to this namespace. This is required to get
prometheus metrics and alerts for the OCP storage dashboards. To label the
openshift-storage namespace use the following command:
oc label namespace openshift-storage "openshift.io/cluster-monitoring=true"
📌 NOTE
The creation of the openshift-storage namespace, and the monitoring
label added to this namespace, can also be done during the OCS operator
installation using the Openshift Web Console.
In the Openshift Web Console, navigate to the Operators -> OperatorHub menu.
OCP OperatorHub
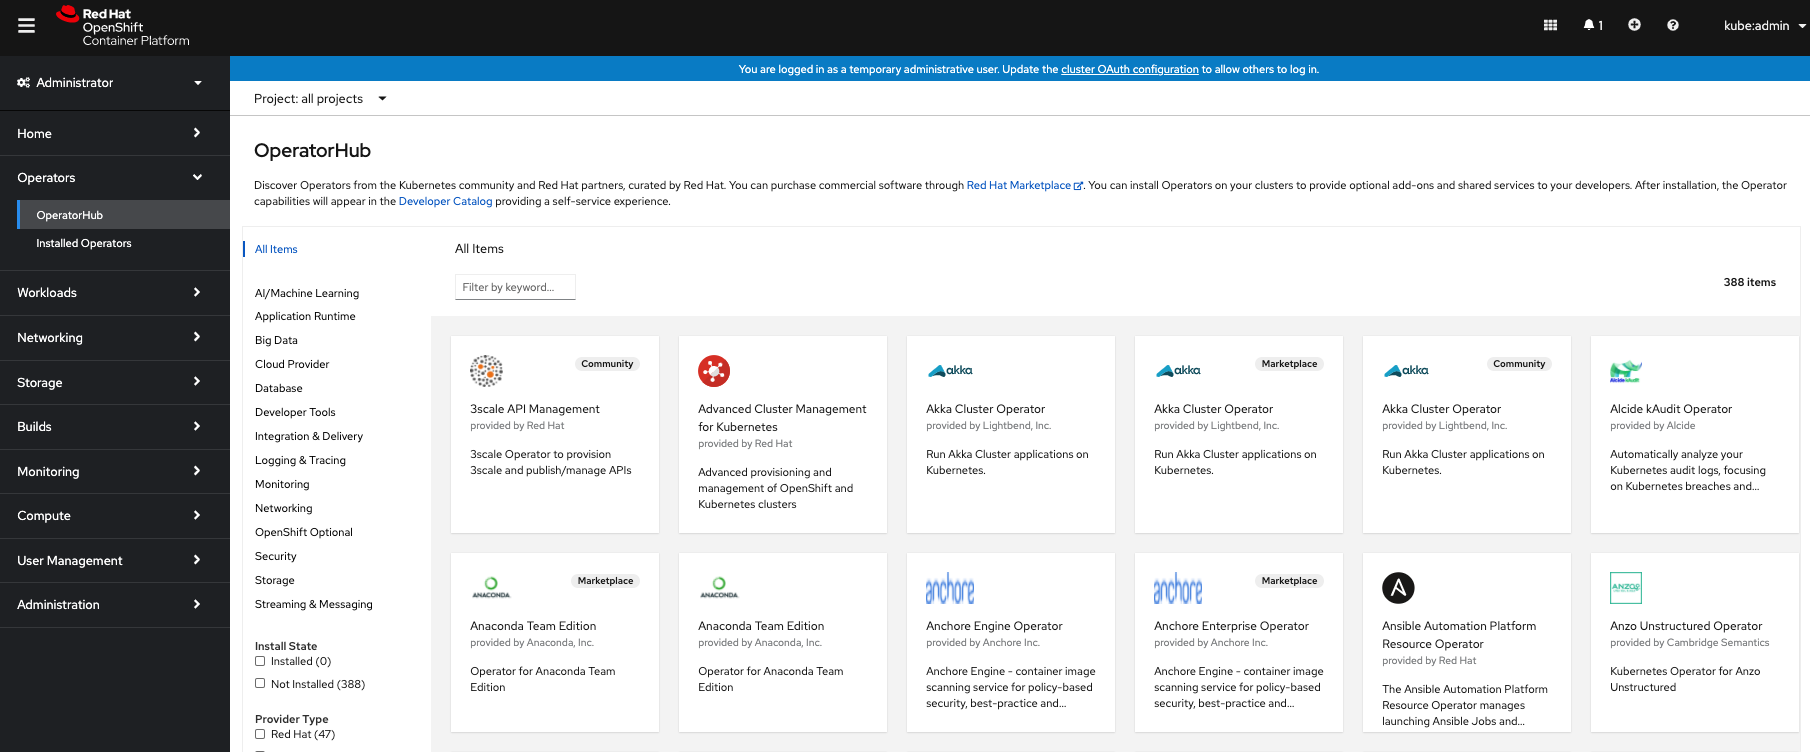
Now type openshift container storage in the Filter by keyword… box.
OCP OperatorHub filter on OpenShift Container Storage Operator
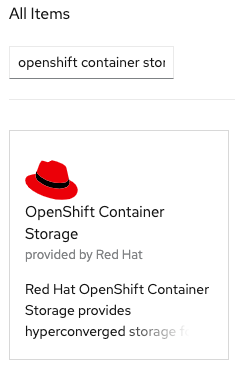
Select OpenShift Container Storage Operator and then select Install.
OCP OperatorHub Install OpenShift Container Storage
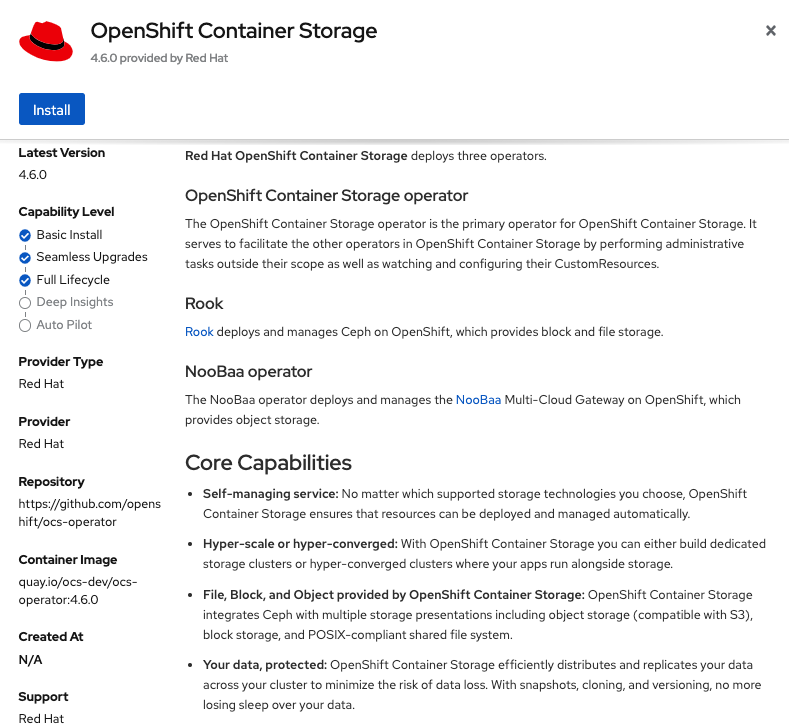
On the next screen make sure the settings are as shown in this figure.
OCP Subscribe to OpenShift Container Storage
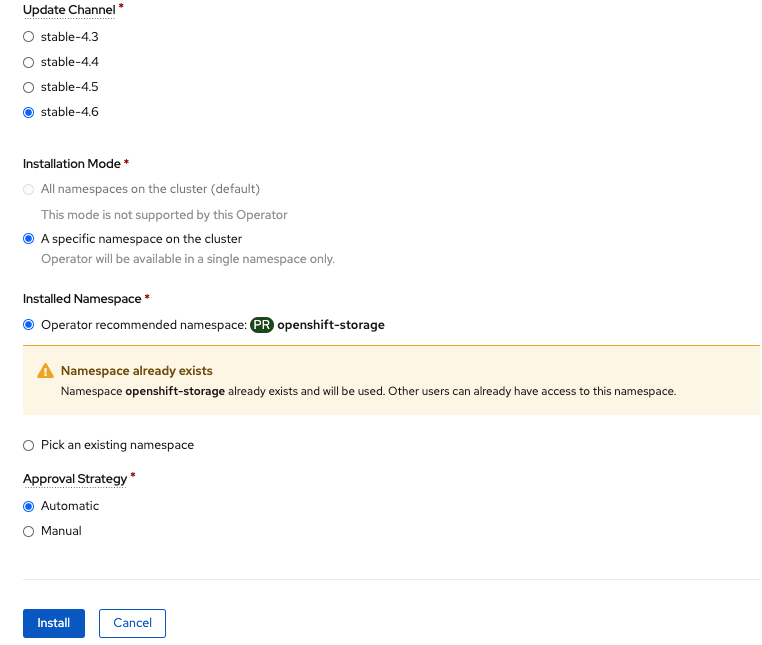
Click Install.
Now you can go back to your terminal window to check the progress of the installation.
oc -n openshift-storage get csv
Example output:
NAME                  DISPLAY                       VERSION   REPLACES   PHASE
ocs-operator.v4.6.0   OpenShift Container Storage   4.6.0                Succeeded
Please wait until the operator PHASE changes to Succeeded
🔥 CAUTION
This will mark that the installation of your operator was successful. Reaching this state can take several minutes.
You will now also see new operator pods in openshift-storage namespace:
oc -n openshift-storage get pods
Example output:
NAME                                    READY   STATUS    RESTARTS   AGE
noobaa-operator-88798865f-hlwtt         1/1     Running   0          6m57s
ocs-metrics-exporter-5495fd48b9-xzxpm   1/1     Running   0          6m57s
ocs-operator-6fcc5f798f-gdkrx           1/1     Running   0          6m57s
rook-ceph-operator-8659478f5-qhghs      1/1     Running   0          6m57s
Now switch back to your Openshift Web Console for the remainder of the installation for OCS 4.
Select View Operator in figure below to get to the OCS configuration screen.
View Operator in openshift-storage namespace
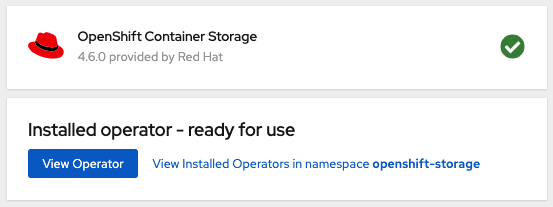
OCS configuration screen

On the top of the OCS configuration screen, scroll over to the right and click
on Storage Cluster and then click on Create Storage Cluster to the far
right. If you do not see Create Storage Cluster refresh your browser window.
Create Storage Cluster

The Create Storage Cluster screen will display.
Create Storage Cluster default settings
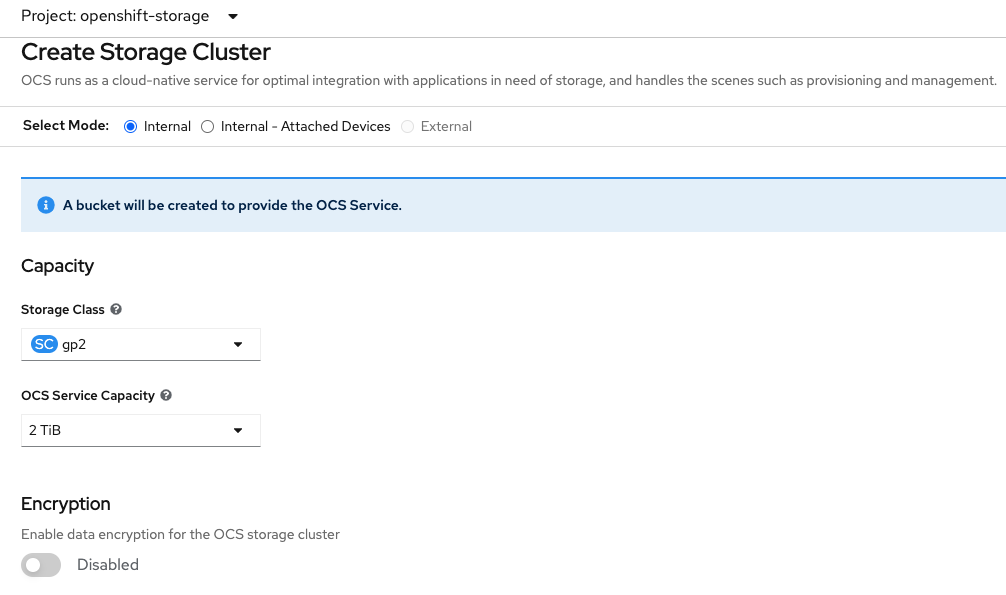
Leave the default selection of Internal, gp2, 2 TiB and Encryption Disabled.
Create a new storage cluster
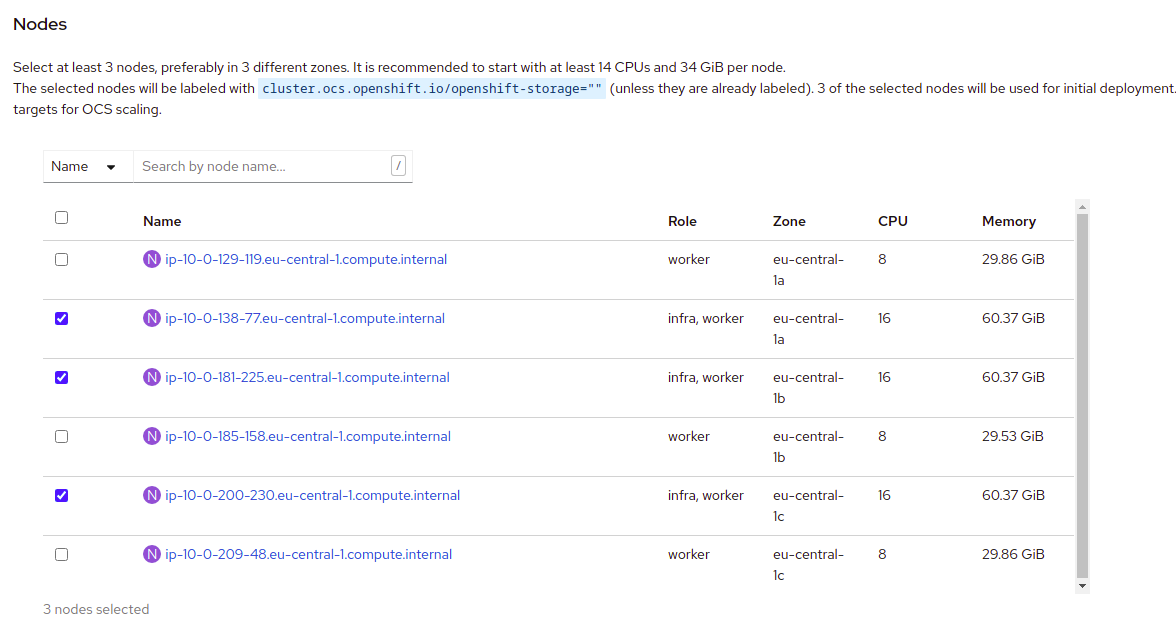
There should be 3 worker nodes already selected that had the OCS label applied in the last section. Execute command below and make sure they are all selected.
oc get nodes --show-labels | grep ocs |cut -d' ' -f1
Then click on the button Create below the dialog box with the 3 workers
selected with a checkmark.
You can watch the deployment using the Openshift Web Console by going
back to the Openshift Container Storage Operator screen and selecting All
instances.
Please wait until all Pods are marked as Running in the CLI or until you
see all instances shown below as Ready Status in the Web Console as shown in the following diagram:
OCS instance overview after cluster install is finished
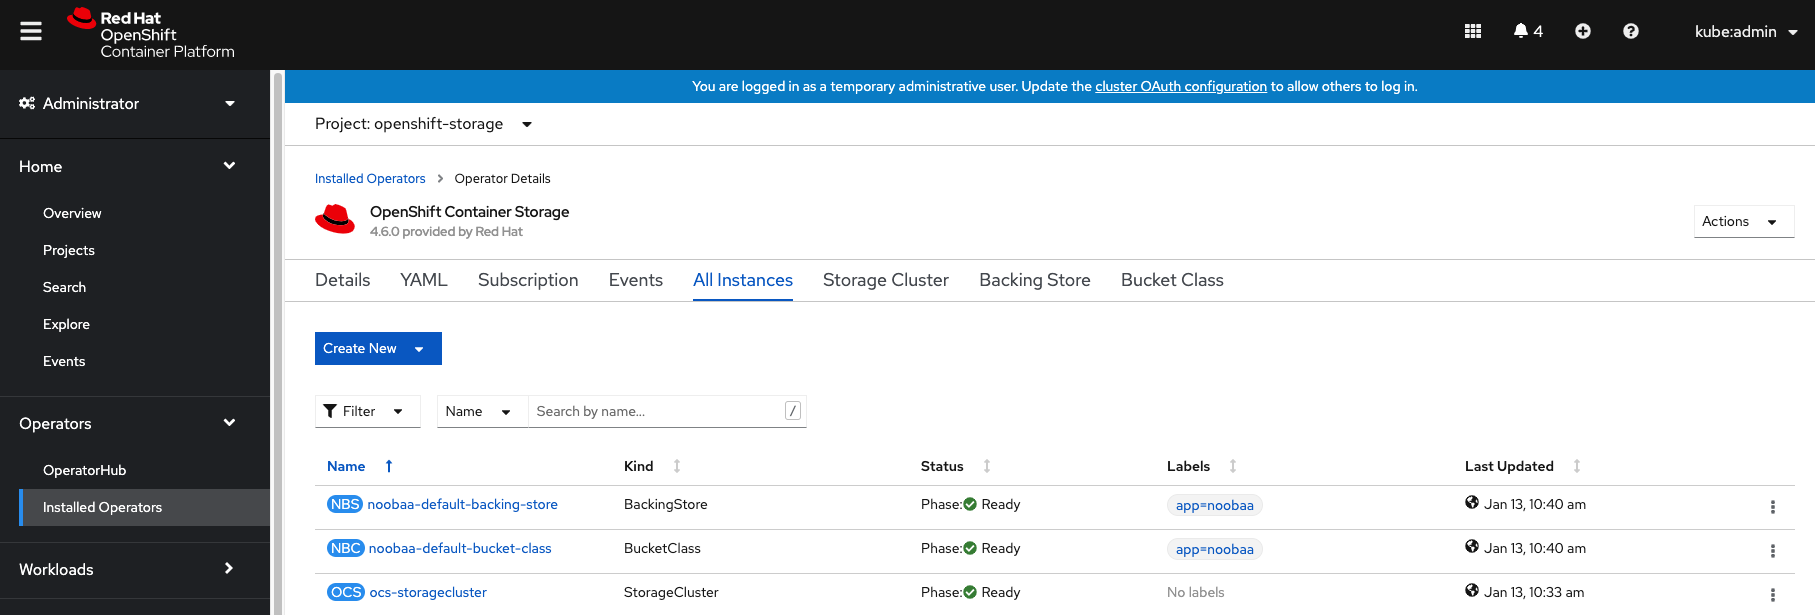
oc -n openshift-storage get pods
Output when the cluster installation is finished
NAME                                                              READY   STATUS      RESTART
S   AGE
csi-cephfsplugin-875xd                                            3/3     Running     0
    23m
csi-cephfsplugin-bncsj                                            3/3     Running     0
    23m
csi-cephfsplugin-hjv77                                            3/3     Running     0
    23m
csi-cephfsplugin-lch4m                                            3/3     Running     0
    23m
csi-cephfsplugin-provisioner-6cfdc4bfbb-cklxs                     6/6     Running     0
    23m
csi-cephfsplugin-provisioner-6cfdc4bfbb-krkq5                     6/6     Running     0
    23m
csi-cephfsplugin-wtp4v                                            3/3     Running     0
    23m
csi-rbdplugin-7clqf                                               3/3     Running     0
    23m
csi-rbdplugin-8nllt                                               3/3     Running     0
    23m
csi-rbdplugin-d267h                                               3/3     Running     0
    23m
csi-rbdplugin-provisioner-b46dd5c7-vd58q                          6/6     Running     0
    23m
csi-rbdplugin-provisioner-b46dd5c7-z8mx6                          6/6     Running     0
    23m
csi-rbdplugin-tdj8f                                               3/3     Running     0
    23m
csi-rbdplugin-wp65b                                               3/3     Running     0
    23m
noobaa-core-0                                                     1/1     Running     0
    19m
noobaa-db-0                                                       1/1     Running     0
    19m
noobaa-endpoint-86cc5df669-ffqj2                                  1/1     Running     0
    16m
noobaa-operator-698746cd47-sp6w9                                  1/1     Running     0
    17h
ocs-metrics-exporter-78bc44687-pg4hk                              1/1     Running     0
    17h
ocs-operator-6d99bc6787-d7m9d                                     1/1     Running     0
    17h
rook-ceph-crashcollector-ip-10-0-147-230-7cbf854757-chlgs         1/1     Running     0
    20m
rook-ceph-crashcollector-ip-10-0-175-8-5779d5d5df-p6hkl           1/1     Running     0
    21m
rook-ceph-crashcollector-ip-10-0-209-53-7ccc4cc785-wjxzd          1/1     Running     0
    21m
rook-ceph-drain-canary-128c383c26627b938ab0fd7f47f58d33-665pbsg   1/1     Running     0
    19m
rook-ceph-drain-canary-84c954eec459013180f78efd0a35792c-7b6qdnj   1/1     Running     0
    19m
rook-ceph-drain-canary-ip-10-0-175-8.eu-central-1.compute.intrh526   1/1     Running     0
    19m
rook-ceph-mds-ocs-storagecluster-cephfilesystem-a-756df8b4kp9kr   1/1     Running     0
    18m
rook-ceph-mds-ocs-storagecluster-cephfilesystem-b-64585764bbg6b   1/1     Running     0
    18m
rook-ceph-mgr-a-5c74bb4b85-5x26g                                  1/1     Running     0
    20m
rook-ceph-mon-a-746b5457c-hlh7n                                   1/1     Running     0
    21m
rook-ceph-mon-b-754b99cfd-xs9g4                                   1/1     Running     0
    21m
rook-ceph-mon-c-7474d96f55-qhhb6                                  1/1     Running     0
    20m
rook-ceph-operator-59f7fb95d6-sdjd8                               1/1     Running     0
    17h
rook-ceph-osd-0-7d45696497-jwgb7                                  1/1     Running     0
    19m
rook-ceph-osd-1-6f49b665c7-gxq75                                  1/1     Running     0
    19m
rook-ceph-osd-2-76ffc64cd-9zg65                                   1/1     Running     0
    19m
rook-ceph-osd-prepare-ocs-deviceset-gp2-0-data-0-9977n-49ngd      0/1     Completed   0
    20m
rook-ceph-osd-prepare-ocs-deviceset-gp2-1-data-0-nnmpv-z8vq6      0/1     Completed   0
    20m
rook-ceph-osd-prepare-ocs-deviceset-gp2-2-data-0-mtbtj-xrj2n      0/1     Completed   0
    20m
The great thing about operators and OpenShift is that the operator has the
intelligence about the deployed components built-in. And, because of the
relationship between the CustomResource and the operator, you can check the
status by looking at the CustomResource itself. When you went therough the UI
dialogs, ultimately in the back-end an instance of a StorageCluster was
created:
oc get storagecluster -n openshift-storage
Output when the cluster installation is finished
NAME                          PROVISIONER                             RECLAIMPOLICY   VOLUMEBINDINGMODE      ALLOWVOLUMEEXPANSION   AGE
gp2 (default)                 kubernetes.io/aws-ebs                   Delete          WaitForFirstConsumer   true                   107m
gp2-csi                       ebs.csi.aws.com                         Delete          WaitForFirstConsumer   true                   107m
ocs-storagecluster-ceph-rbd   openshift-storage.rbd.csi.ceph.com      Delete          Immediate              true                   40m
ocs-storagecluster-cephfs     openshift-storage.cephfs.csi.ceph.com   Delete          Immediate              true                   40m
openshift-storage.noobaa.io   openshift-storage.noobaa.io/obc         Delete          Immediate              false                  34m
You can check the status of the storage cluster with the following:
oc get storagecluster -n openshift-storage ocs-storagecluster -o jsonpath='{.status.phase}{"\n"}'
If it says Ready, you can continue.
# Getting to know the Storage Dashboards
You can now also check the status of your storage cluster with the OCS specific
Dashboards that are included in your Openshift Web Console. You can reach
this by clicking on Overview on your left navigation bar, then selecting
Persistent Storage on the top navigation bar of the content page.
Location of OCS Dashboards

📌 NOTE
If you just finished your OCS 4 deployment it could take 5-10 minutes
for your Dashboards to fully populate. Different versions of OCP 4 may have minor differences in Dashboard sections and naming of Dashboards.
Storage Dashboard after successful storage installation
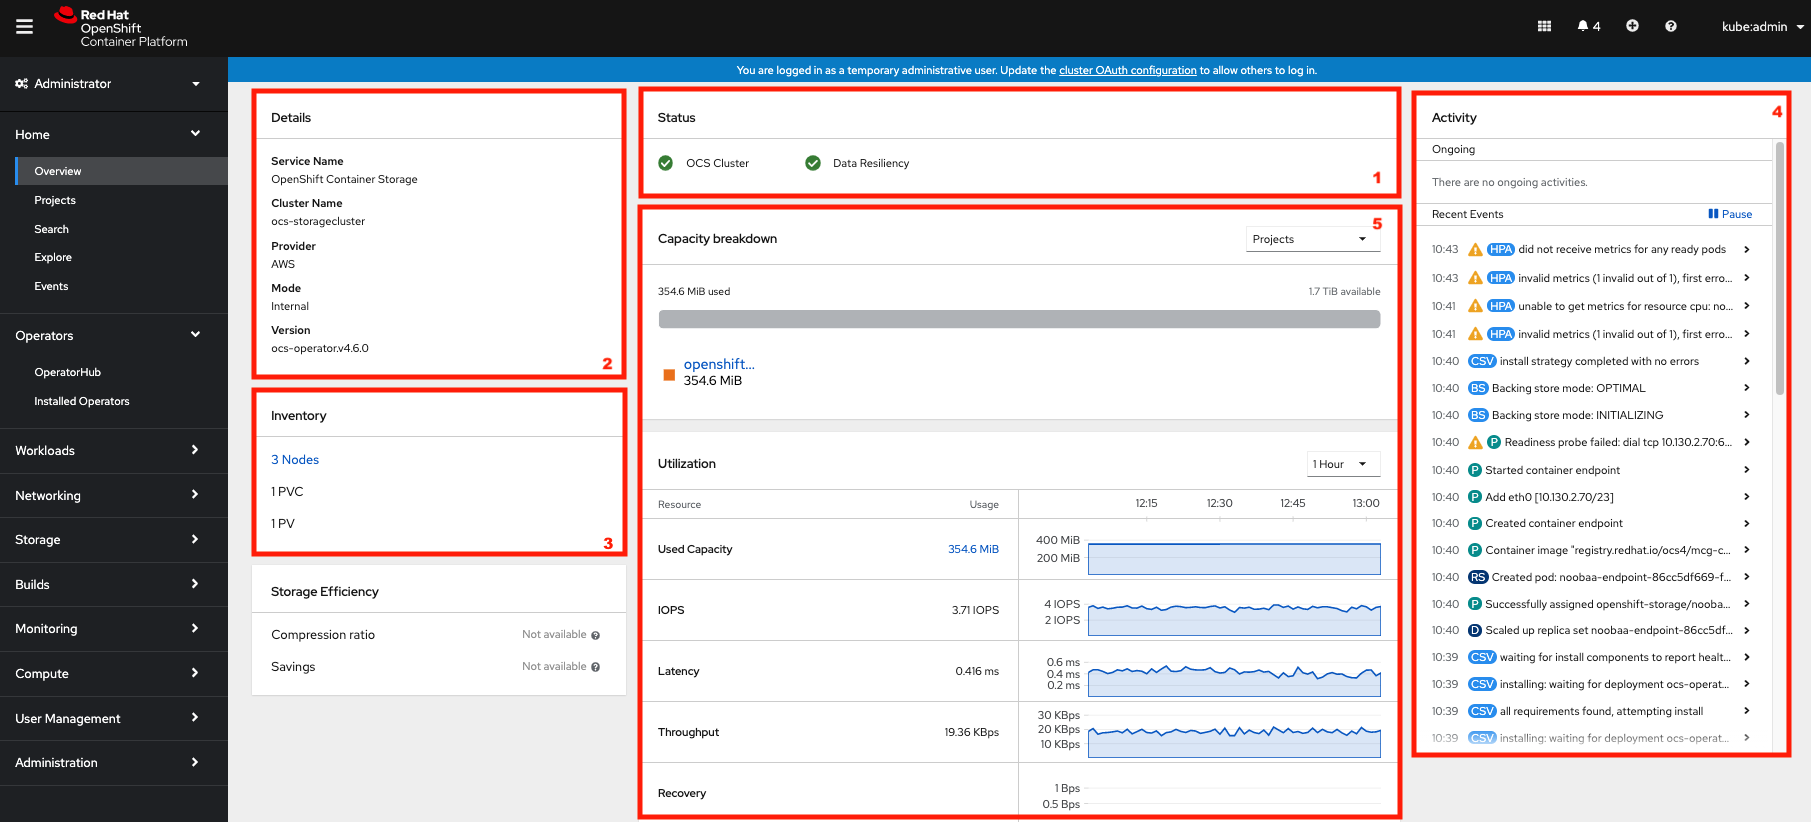
| 1 | Health | Quick overview of the general health of the storage cluster |
| 2 | Details | Overview of the deployed storage cluster version and backend provider |
| 3 | Inventory | List of all the resources that are used and offered by the storage system |
| 4 | Events | Live overview of all the changes that are being done affecting the storage cluster |
| 5 | Utilization | Overview of the storage cluster usage and performance |
OCS ships with a Dashboard for the Object Store service as well. From the Overview click on the Object Service on the top
navigation bar of the content page.
OCS Multi-Cloud-Gateway Dashboard after successful installation
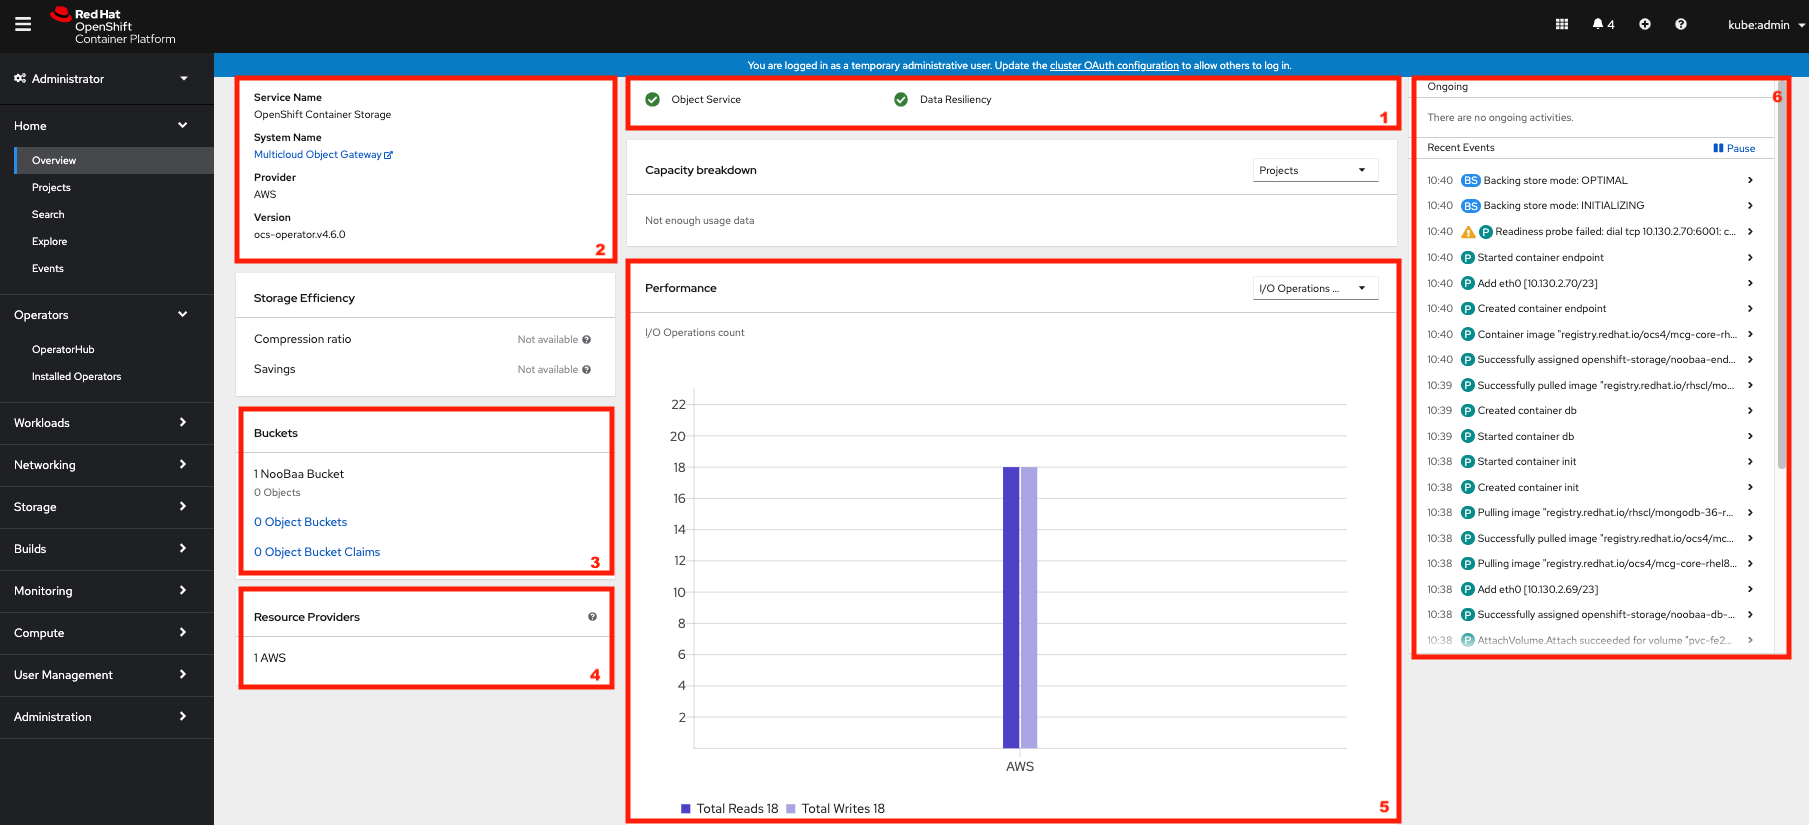
| 1 | Health | Quick overview of the general health of the Multi-Cloud-Gateway |
| 2 | Details | Overview of the deployed MCG version and backend provider including a link to the MCG Console |
| 3 | Buckets | List of all the ObjectBucket with are offered and ObjectBucketClaims which are connected to them |
| 4 | Resource Providers | Shows the list of configured Resource Providers that are available as backing storage in the MCG |
| 5 | Counters | Shows the current numbers of reads and writes issued against each provider |
| 6 | Events | Live overview of all the changes that are being done affecting the MCG |
Once this is all healthy, you will be able to use the three new StorageClasses created during the OCS 4 Install:
- ocs-storagecluster-ceph-rbd
- ocs-storagecluster-cephfs
- openshift-storage.noobaa.io
You can see these three StorageClasses from the Openshift Web Console by
expanding the Storage menu in the left navigation bar and selecting
Storage Classes. You can also run the command below:
oc -n openshift-storage get sc
Please make sure the three storage classes are available in your cluster before proceeding.
📌 NOTE
The NooBaa pod used the ocs-storagecluster-ceph-rbd storage class for
creating a PVC for mounting to the db container.
Using the Rook-Ceph toolbox to check on the Ceph backing storage
Since the Rook-Ceph toolbox is not shipped with OCS, we need to deploy it manually.
You can patch the OCSInitialization ocsinit using the following command line:
oc patch OCSInitialization ocsinit -n openshift-storage --type json --patch  '[{ "op": "replace", "path": "/spec/enableCephTools", "value": true }]'
TOOLS_POD=$(oc get pods -n openshift-storage -l app=rook-ceph-tools -o name)
oc rsh -n openshift-storage pod/$TOOLS_POD ceph df
Example output
RAW STORAGE:
    CLASS     SIZE      AVAIL       USED        RAW USED     %RAW USED
    ssd       6 TiB     6.0 TiB     101 MiB      3.1 GiB          0.05
    TOTAL     6 TiB     6.0 TiB     101 MiB      3.1 GiB          0.05

POOLS:
    POOL                                           ID     STORED      OBJECTS     USED        %USED     MAX AVAIL
    ocs-storagecluster-cephblockpool                1      33 MiB          63     100 MiB         0       1.7 TiB
    ocs-storagecluster-cephfilesystem-metadata      2     2.2 KiB          22      96 KiB         0       1.7 TiB
    ocs-storagecluster-cephfilesystem-data0         3         0 B           0         0 B         0       1.7 TiB
Finally, we are ready to move the monitoring applications to the infra nodes as well. This will enble us to free up resources for applications running on worker nodes. Ultimately this will incur us into minimizing the number of entitlements necessary to keep the cluster up and running.
oc apply -f https://raw.githubusercontent.com/mikelo/mikelo.github.io/master/ocs/cluster-monitoring-configmap.storage.yaml
Monitor the status of the newly applied configuration:
oc get pod -o wide
Example output:
NAME                                           READY   STATUS    RESTARTS   AGE     IP             NODE                                            NOMINATED NODE   READINESS GATES
alertmanager-main-0                            5/5     Running   0          42s     10.128.4.13    ip-10-0-223-56.eu-central-1.compute.internal    <none>           <none>
alertmanager-main-1                            5/5     Running   0          69s     10.130.2.14    ip-10-0-189-227.eu-central-1.compute.internal   <none>           <none>
alertmanager-main-2                            5/5     Running   0          95s     10.131.2.20    ip-10-0-139-155.eu-central-1.compute.internal   <none>           <none>
cluster-monitoring-operator-79b8bcd7d7-cmb56   2/2     Running   3          6h33m   10.128.0.4     ip-10-0-223-47.eu-central-1.compute.internal    <none>           <none>
grafana-649bb46c47-vkvqq                       2/2     Running   0          91s     10.131.2.22    ip-10-0-139-155.eu-central-1.compute.internal   <none>           <none>
kube-state-metrics-76ff46f884-ntgnx            3/3     Running   0          99s     10.131.2.16    ip-10-0-139-155.eu-central-1.compute.internal   <none>           <none>
node-exporter-2pc52                            2/2     Running   0          6h22m   10.0.194.74    ip-10-0-194-74.eu-central-1.compute.internal    <none>           <none>
node-exporter-7sqnf                            2/2     Running   0          5h48m   10.0.189.227   ip-10-0-189-227.eu-central-1.compute.internal   <none>           <none>
node-exporter-9sfvw                            2/2     Running   0          6h28m   10.0.132.238   ip-10-0-132-238.eu-central-1.compute.internal   <none>           <none>
node-exporter-b8df5                            2/2     Running   0          6h22m   10.0.129.227   ip-10-0-129-227.eu-central-1.compute.internal   <none>           <none>
node-exporter-bdbv9                            2/2     Running   0          6h22m   10.0.166.96    ip-10-0-166-96.eu-central-1.compute.internal    <none>           <none>
node-exporter-d549q                            2/2     Running   0          5h48m   10.0.223.56    ip-10-0-223-56.eu-central-1.compute.internal    <none>           <none>
node-exporter-m7ghp                            2/2     Running   0          6h28m   10.0.167.222   ip-10-0-167-222.eu-central-1.compute.internal   <none>           <none>
node-exporter-rxpvm                            2/2     Running   0          5h48m   10.0.139.155   ip-10-0-139-155.eu-central-1.compute.internal   <none>           <none>
node-exporter-tbl7v                            2/2     Running   0          6h28m   10.0.223.47    ip-10-0-223-47.eu-central-1.compute.internal    <none>           <none>
openshift-state-metrics-97b67f7bf-2gnbt        3/3     Running   0          99s     10.131.2.17    ip-10-0-139-155.eu-central-1.compute.internal   <none>           <none>
prometheus-adapter-5b95948cbb-td86s            1/1     Running   0          94s     10.131.2.21    ip-10-0-139-155.eu-central-1.compute.internal   <none>           <none>
prometheus-adapter-5b95948cbb-tdh7x            1/1     Running   0          84s     10.130.2.13    ip-10-0-189-227.eu-central-1.compute.internal   <none>           <none>
prometheus-k8s-0                               6/6     Running   1          51s     10.130.2.15    ip-10-0-189-227.eu-central-1.compute.internal   <none>           <none>
prometheus-k8s-1                               6/6     Running   1          89s     10.131.2.23    ip-10-0-139-155.eu-central-1.compute.internal   <none>           <none>
prometheus-operator-d4b8885b9-h6x9b            2/2     Running   0          99s     10.131.2.18    ip-10-0-139-155.eu-central-1.compute.internal   <none>           <none>
telemeter-client-769bccbc99-t7fsl              3/3     Running   0          96s     10.131.2.19    ip-10-0-139-155.eu-central-1.compute.internal   <none>           <none>
thanos-querier-bf7898547-r8gjd                 5/5     Running   0          6h20m   10.129.2.4     ip-10-0-129-227.eu-central-1.compute.internal   <none>           <none>
thanos-querier-bf7898547-rk7cd                 5/5     Running   0          6h20m   10.131.0.10    ip-10-0-166-96.eu-central-1.compute.internal    <none>
Note that pods are starting to gradually move to the infra nodes. Each monitoring component has tainted elements built inside of them, here’s a snippet for one of them:
    prometheusK8s:
      nodeSelector:
        node-role.kubernetes.io/infra: ""
      tolerations:
      - key: infra
        value: reserved
        effect: NoExecute
      - key: node.ocs.openshift.io/storage
        value: "true"
        effect: NoSchedule
Test an OCP application deployment using a CephFS volume
In this section the ocs-storagecluster-cephfs StorageClass will be used
by an OCP application and a database Deployment to create an RWO (ReadWriteOnce)
persistent storage.
In this case we are following this blog
📌 NOTE
we added a few twearks to the YAML file and the testing scripts to make it work for our cluster
Start by creating a new project:
oc new-project sysbench
Then use the MySQL/sysbench YAML to create the new StatefulSet.
oc apply -f https://raw.githubusercontent.com/mikelo/mikelo.github.io/master/ocs/OCS-FS-STS.yaml
Check that the PVC is created.
oc get pvc
Example output:
NAME                                STATUS   VOLUME                                     CAPACITY   ACCESS MODES   STORAGECLASS                AGE
mysql-ocs-fs-data-mysql-ocs-fs-0    Bound    pvc-0194b560-1593-4ae7-a527-9331e35e28c1   15Gi       RWO            ocs-storagecluster-cephfs   21s
mysql-ocs-fs-data-mysql-ocs-fs-1    Bound    pvc-c76a39da-40de-4b07-a836-7e20a15fb565   15Gi       RWO            ocs-storagecluster-cephfs   20s
mysql-ocs-fs-data-mysql-ocs-fs-10   Bound    pvc-117ad8ae-5774-4891-b1fd-5fcfd90d52bc   15Gi       RWO            ocs-storagecluster-cephfs   20s
mysql-ocs-fs-data-mysql-ocs-fs-11   Bound    pvc-67ce4daa-50f2-4e8b-b9ea-36b93710e8d7   15Gi       RWO            ocs-storagecluster-cephfs   20s
mysql-ocs-fs-data-mysql-ocs-fs-12   Bound    pvc-f8cb5c94-7c56-406c-97fe-f9255d60b273   15Gi       RWO            ocs-storagecluster-cephfs   20s
mysql-ocs-fs-data-mysql-ocs-fs-13   Bound    pvc-f5ac6748-65ba-45d0-8ce6-1d0aeeef48e9   15Gi       RWO            ocs-storagecluster-cephfs   20s
mysql-ocs-fs-data-mysql-ocs-fs-14   Bound    pvc-472e4dfe-3fc7-4e84-8ab7-8113eefa34c9   15Gi       RWO            ocs-storagecluster-cephfs   20s
mysql-ocs-fs-data-mysql-ocs-fs-15   Bound    pvc-904de214-e551-4034-965e-ce3862ff3c97   15Gi       RWO            ocs-storagecluster-cephfs   20s
mysql-ocs-fs-data-mysql-ocs-fs-16   Bound    pvc-9e513ce0-0542-4e58-98ab-480bd27689c2   15Gi       RWO            ocs-storagecluster-cephfs   20s
mysql-ocs-fs-data-mysql-ocs-fs-17   Bound    pvc-8123f988-ad05-4c13-a539-b9d215f6af6b   15Gi       RWO            ocs-storagecluster-cephfs   20s
mysql-ocs-fs-data-mysql-ocs-fs-18   Bound    pvc-3397e003-fb04-45d3-b949-1aa9cd20e33f   15Gi       RWO            ocs-storagecluster-cephfs   20s
mysql-ocs-fs-data-mysql-ocs-fs-19   Bound    pvc-c054e10f-22af-4ac6-96e4-8cbba1303d29   15Gi       RWO            ocs-storagecluster-cephfs   20s
mysql-ocs-fs-data-mysql-ocs-fs-2    Bound    pvc-37444f2b-17cf-4198-8501-6638f0a9ef1c   15Gi       RWO            ocs-storagecluster-cephfs   20s
mysql-ocs-fs-data-mysql-ocs-fs-3    Bound    pvc-065a8160-911c-4b77-ab91-3c9b92c8726d   15Gi       RWO            ocs-storagecluster-cephfs   20s
mysql-ocs-fs-data-mysql-ocs-fs-4    Bound    pvc-94a5112d-9102-4a1f-be7a-b4d77897d719   15Gi       RWO            ocs-storagecluster-cephfs   20s
mysql-ocs-fs-data-mysql-ocs-fs-5    Bound    pvc-4a84fee5-f132-465a-95fd-258ec1478067   15Gi       RWO            ocs-storagecluster-cephfs   20s
mysql-ocs-fs-data-mysql-ocs-fs-6    Bound    pvc-c6037407-1bc1-46cb-8605-50351b40a812   15Gi       RWO            ocs-storagecluster-cephfs   20s
mysql-ocs-fs-data-mysql-ocs-fs-7    Bound    pvc-c5106001-76f0-42d4-b864-9e667f234bb7   15Gi       RWO            ocs-storagecluster-cephfs   20s
mysql-ocs-fs-data-mysql-ocs-fs-8    Bound    pvc-307b0056-3039-4752-9295-f871f9298f38   15Gi       RWO            ocs-storagecluster-cephfs   20s
mysql-ocs-fs-data-mysql-ocs-fs-9    Bound    pvc-e855f29c-99a8-43b2-bb6e-c46c4f730c48   15Gi       RWO            ocs-storagecluster-cephfs   20s
This step could take 5 or more minutes. Wait until there are 2 Pods in
Running STATUS and 4 Pods in Completed STATUS as shown below.
oc get pods
Example output:
NAME              READY   STATUS    RESTARTS   AGE
mysql-ocs-fs-0    2/2     Running   0          3m40s
mysql-ocs-fs-1    2/2     Running   0          3m40s
mysql-ocs-fs-10   2/2     Running   0          3m40s
mysql-ocs-fs-11   2/2     Running   0          3m40s
mysql-ocs-fs-12   2/2     Running   0          3m40s
mysql-ocs-fs-13   2/2     Running   0          3m40s
mysql-ocs-fs-14   2/2     Running   0          3m39s
mysql-ocs-fs-15   2/2     Running   0          3m39s
mysql-ocs-fs-16   2/2     Running   0          3m39s
mysql-ocs-fs-17   2/2     Running   0          3m39s
mysql-ocs-fs-18   2/2     Running   0          3m39s
mysql-ocs-fs-19   2/2     Running   0          3m39s
mysql-ocs-fs-2    2/2     Running   0          3m40s
mysql-ocs-fs-3    2/2     Running   0          3m40s
mysql-ocs-fs-4    2/2     Running   0          3m40s
mysql-ocs-fs-5    2/2     Running   0          3m40s
mysql-ocs-fs-6    2/2     Running   0          3m40s
mysql-ocs-fs-7    2/2     Running   0          3m40s
mysql-ocs-fs-8    2/2     Running   0          3m40s
mysql-ocs-fs-9    2/2     Running   0          3m40s
Once the deployment is complete you can now test the application and the persistent storage on Ceph.
for pod in $(oc get pods|grep mysql|awk '{print $1}');do echo "pod $pod";oc rsh -c mysql-ocs-fs mysql-ocs-fs-9 mysql -uroot -ppassword -h localhost sysbench -e "SELECT count(1) from sbtest10;";done
Example output:
pod mysql-ocs-fs-0
mysql: [Warning] Using a password on the command line interface can be insecure.
+----------+
| count(1) |
+----------+
|  1000000 |
+----------+
pod mysql-ocs-fs-1
mysql: [Warning] Using a password on the command line interface can be insecure.
+----------+
| count(1) |
+----------+
|  1000000 |
+----------+
We’re now going to check again that our storage is actually being used as expected:
TOOLS_POD=$(oc get pods -n openshift-storage -l app=rook-ceph-tools -o name)
oc rsh -n openshift-storage pod/$TOOLS_POD ceph df
Example output
RAW STORAGE:
    CLASS     SIZE	AVAIL       USED       RAW USED     %RAW USED
    ssd       6 TiB     5.9 TiB     88 GiB	 91 GiB          1.49
    TOTAL     6 TiB     5.9 TiB     88 GiB	 91 GiB          1.49

POOLS:
    POOL                                           ID     STORED      OBJECTS     USED        %USED     MAX AVAIL
    ocs-storagecluster-cephblockpool                1	   57 MiB          68     170 MiB         0	  1.7 TiB
    ocs-storagecluster-cephfilesystem-metadata      2     191 MiB         213     572 MiB      0.01	  1.7 TiB
    ocs-storagecluster-cephfilesystem-data0         3	   29 GiB      13.17k	   88 GiB      1.68	  1.7 TiB
This guide ends here. It is intentionally been kept short in order to have simple and quick end-to-end steps to get a working OCS solution running.
tags: